This document will describe how to setup MS Exchange 2007/2010 for configurating with SmartPOP2Exchange.
1. Add Exchange System Manager to a MMC console
Open any MMC console (*.msc file) or create a new one by executing "mmc.exe".
Choose File | Snap-In add/remove from the menu. Then select Microsoft Exchange and Add it.
2. Setting the accepted domains
You need to tell the Exchange Server which mail domains it is responsible for.
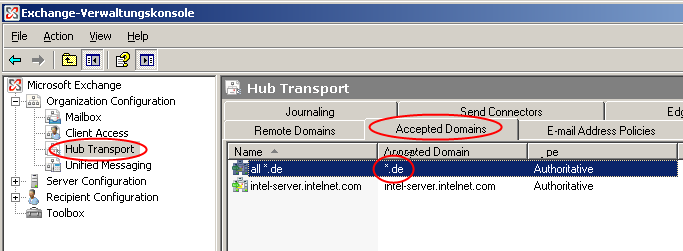
Choose the Accepted Domains tab in the Hub Transport settings of the Organization Configuration.
You may create one entry for every domain used by your users or by yourself and create a single entry for accepting all mail messages. This is only recommended if the Exchange server is not accessible from outside your network.
3. Setting anonymous access to the receiving SMTP
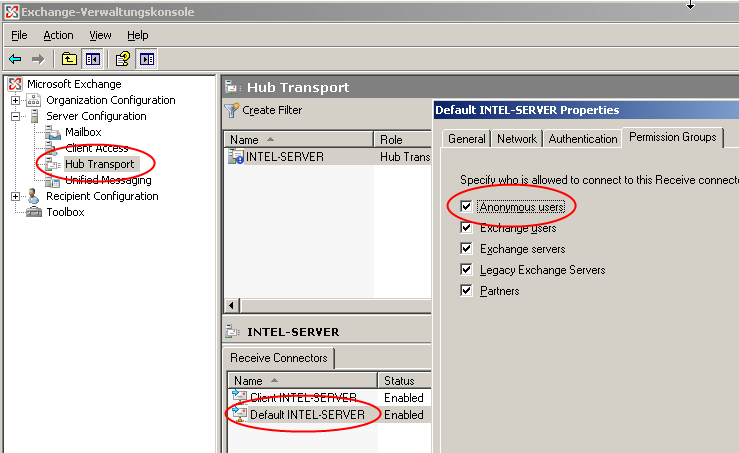
Unlike with Exchange 2003 the option enabling "Anonymous user" for incoming mails is not activated.
We recommend enabling this option to by-pass SMTP authentication settings in SmartPOP2Exchange.
4. Configure Outgoing Mail
By default the Exchange 2007 Server has no Send Connectors. So you need to set one up yourself.
Choose the Send Connectors tab in the Hub Transport settings of the Organization Configuration and add a new Send Connector for outgoing mail with the following settings:
- Name: <choose one>
- intended use: Internet
- Address space: *
- Network settings:
- choose the first option (DNS)
if your Exchange is directly connected to the internet and has a fixed IP address.
- use the second option (smart host)
if you need to send your mail through the SMTP server of your provider.
You have to add that server name and enter your username/password on the following setup page
by using the "Basic Authentication" option.
5. Configure SmartPOP2Exchange
To install SmartPOP2Exchange on your computer, you simply run the setup file and follow the instructions on the screen.
Please start your newly installed SmartPOP2Exchange. If you haven't already created an account an Account Wizard should appear now. If you can't see the Account Wizard click the Account Wizard button to open it.
| · | Click Next; |
| · | Please enter a random name for your account (e.g. "My Account"); |
| · | Now enter users SMTP email address where SmartPOP2Exchange shall deliver incoming mail to; |
| · | Enter the IP address in the Server (SMTP) field; |
| · | Click Next; |
| · | Enter the name of the POP3 Server and your clients Username and Password on that server in the fields; |
| · | Click Finish; |
6. Message rejected as spam by Content Filtering
This error message is caused by your Exchange Server and not a problem create by SmartPOP2Exchange.
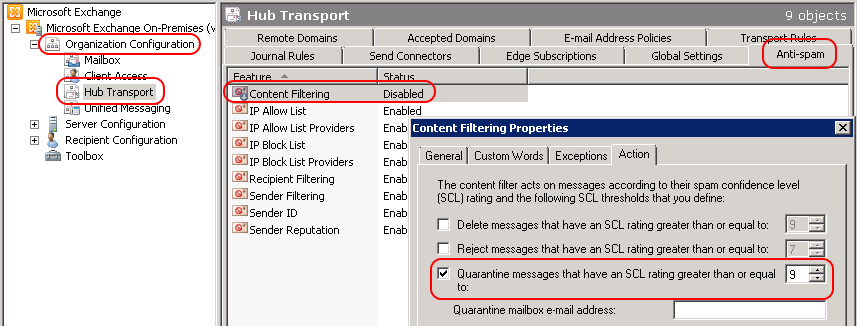
Your Exchange Server also includes a simple spam filter module called IMF. This one refuses messages detected as spam by default.
Because of this SmartPOP2Exchange saves the message and creates that notification message which is instead send to the user to avoid mail loss.
To solve the problem you need to change the behavior of the Exchange Server and make it accept any message from SmartPOP2Exchange.
You either should disable the content filter of the Exchange Server or at least change the action to quarantine instead of refusing:
Configure the Sender- and IP-Filter
If your message gets rejected by Sender-Filtering you have to select a different action. Do this in the properties of the Content Filtering at the Action Panel.
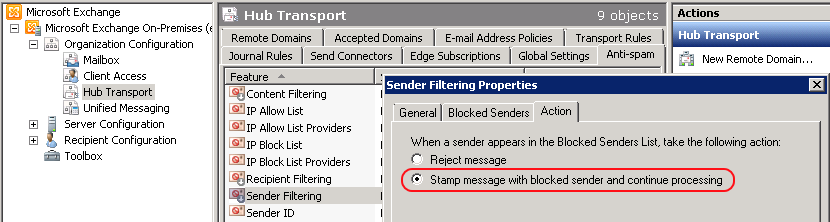
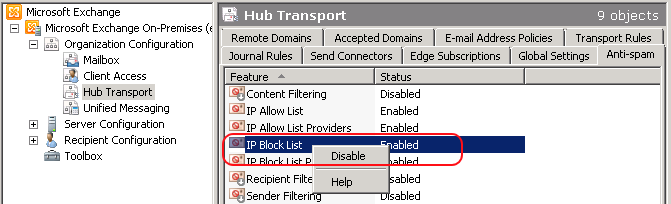
You should also deactivate the IP-filtering by right-clicking the IP Allow List and clicking "Disable" as seen in the screenshot:
You need to configure your Exchange Server to accept any message from SmartPOP2Exchange. Rejecting messages from SmartPOP2Exchange makes no sense.
What should SmartPOP2Exchange do with a rejected message? - Drop it? Then dropping could already be done by your Exchange Server.
Please note that your Exchange Server may also refuse message because their size (default value 10 MB):
http://technet.microsoft.com/en-us/library/aa996835(v=exchg.80).aspx or http://technet.microsoft.com/en-us/library/bb124345.aspx
1. Start the Exchange Management Shell.
2. Type the following commands to set the maximum message size to 100 MB:
Set-TransportConfig -MaxSendSize 100MB.
Get-ReceiveConnector | Set-ReceiveConnector -MaxmessageSize 100MB
(Get-MailBox | Set-Mailbox -MaxReceiveSize 100MB)
[For querying again e.g. "Get-SendConnector | ft Name, MaxMessageSize"]