In this configuration dialog you can set options for the single scans and schedule update scans.
You can find this dialog in the ribbon tab "Scan" (Option "Configure Scans").
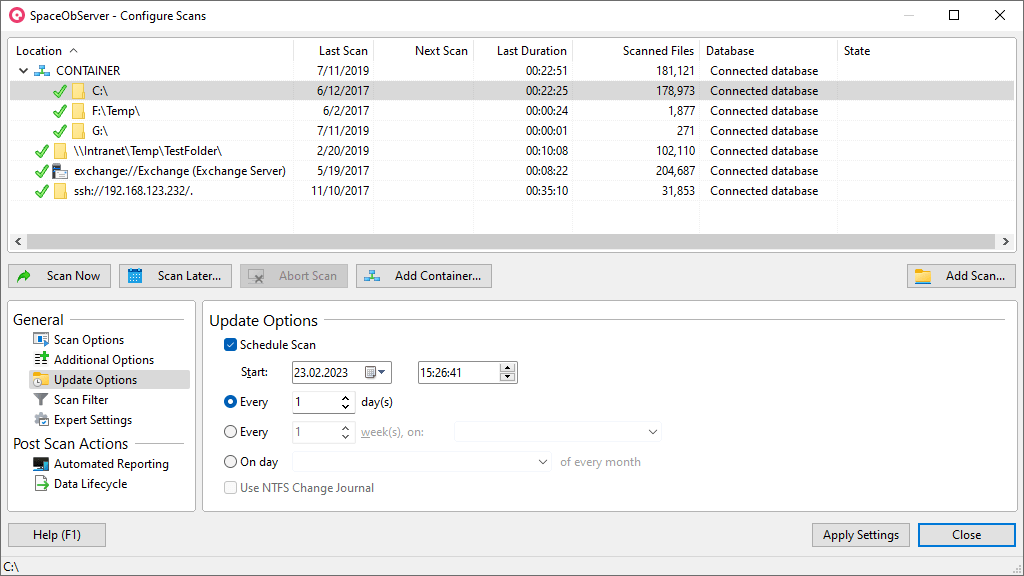
Scanned directories
In the list on the top of this configuration dialog there is information about the scanned directories shown, which are stored in the currently connected database. This information is scan location, the next scan time, the duration of the last scan, the current state and some more. Single columns of the list can be shown/hid by a right-click on the list header.
In the context menu of the list you will find some of the following functions and some additional exporting functionalities.
Below the list, there are the following buttons:
Scan Now |
Starts a scan for the selected directory immediately. |
Scan Later |
Schedules a single scan for the selected directory for a later point in time. |
Abort Scan |
Aborts a running scan of the selected directory. |
Add Container |
Adds a new container, in which you can group several scans in (See "Containers"). |
Add Scan |
Opens a form where you can add a new scan target to be scanned with SpaceObServer. See: "Add Scan Dialog" |
Below these buttons there are several tabs shown where you can modify the scan settings individually for each selected scan:
Scan Options
Follow Mount Points and External Symbolic Links |
This option is relevant for NTFS drives only. You can decide if a scan should follow symbolic links and mount points within the selected directory branch (See NTFS Mount Points for additional information). |
Track NTFS Alternate Data Streams and NTFS Hardlinks |
SpaceObServer can detect ADS (See "Alternate Data Streams") as well as hardlinks and include this values to the calculation of the allocated folder size. Because scanning files for ADS and hardlinks takes quite a long time, this option is deactivated by default to increase the scan performance. Note: In some cases ADS store the content in the Main Data Stream. If a file contains one or more ADS, this does not automatically mean, that the allocated size of the file will increase. |
Calculate MD5 checksums for files |
Activate this option if you want to use the MD5 checksum of files content as indicator to identify "Duplicate Files". Note: The calculation of the MD5 checksums is done by the SpaceObServer scan service, when there is no scan job to execute. You do not need to perform an update scan after activating this option. |
Calculate "Similar Folders" statistics |
Activate this Option, to find similar directory structures, based on the calculated MD5 checksums of the files. Note: "Calculate MD5 checksums" option is needed. |
Calculate Permissions (ACLs) and store in database |
Activate this Option, to store the permissions based on the Active Control List in the database. |
Additional Options
Purge Data older than X Day(s) |
Selects how many days the file system size information of the selected directory remains in the database. The archived size information are needed to build the "History" chart. |
Costs |
Configure the cost value (per GB) and unit for the cost of calculated for the allocated space of files and folder in the selected scan. |
Update Options
Schedule Scan |
Choose this option to scan the selected root directory in a certain interval. You can choose to scan the directory every X days or on a specified day of the week. The time of day when the scan starts can be configured here, too. Note: The directory can only be scanned at the selected time, if the computer, where the SpaceObServer scan service is installed, is running at this time. Otherwise, the directory is scanned the next time, the computer is turned on. Because of performance, directories are not scanned parallel. Though, if another scan is in process at the scan time of a directory, the directory is scanned after the first scan is terminated. |
Use NTFS Change Journal |
By analyzing the NTFS Change Journals (See "Notes on NTFS") SpaceObServer is able to update the database constantly. This results in disk usage information which is always up to date. Check this option to activate the "Change Journal analyzing" for the selected drive. Note: Change Journals are available for local NTFS drives only. They will be activated for a complete drive. |
Scan Filter
Excludes |
If you want to exclude certain files or folders from scanning, add matching patterns here. A pattern may include paths like "C:\Windows\System32*" or just fit to file names, e.g. "*.bak".All files and folders matching one of the pattern specified here will be ignored in a scan. Note: The notation of the filter (UNC path or mapped drive) depends on the notation of the 'Scan Location' in the 'Expert Options'. If the notation differs, the filter is not taken into account. |
Expert Settings
Observing Server |
The "Observing Server" indicates which instance of the SpaceObServer scan service should execute the scan. The observing server is set by default to the name of the server that initially added the scan. If this field is blank, any available instance of the SpaceObServer scan service is allowed to execute the scan.You can also enter more than one server name. The names must be separated with a semicolon (;). |
Database |
Use this option to store the file system sizes of the selected scans in a different database on the connected SQL server. This way the collected information of different scans can be easily separated and the access permissions to these data are configurable through the database access rights. |
Scan Location |
Use this option to change the path of the selected scan. This is necessary, if the scan target has changed (change of hte drive letter, root folder name or UNC path). |
Display Name |
Enter a display name for the selected scan target here. Note: The display name will be used for this scan target in the UI and exports where otherwise the path would be shown. |
User Access |
Use this field to configure a list of users and/or groups which are allowed to see and access the scans and the scanned directory structure in the SpaceObServer user interface. Note: Users and groups have to be entered without a domains. E.g.: "mycompany\smith" is not allowed here. The domain is always given by the executing users. Note: With the button right beside this field you can easily add, remove or modify entries form this list. |
Use different credentials for scan |
Activate this option to use certain credentials for the selected scan(s), other than the credentials of the user account used as logon of the "SpaceObServer scan service" (See: SpaceObServer scan service). The user must belong to either the same domain or a trusted domain! |
Post Scan Actions
Automated Reporting |
Here you can create a new Automated Reporting Action for the selected scan target, as well as see and edit existing actions. |
Data Lifecycle |
Here you can create a new Data Lifecycle Action for the selected scan target, as well as see and edit existing actions. |