

What is Data Lifecycle Management?
A complete guide to manage lifecycle of data.
Ajoschi Roth
Data Lifecycle Management (DLM) is a policy-based approach to accompany a file through the 5 phases of its lifecycle:
- Creation or Collection
- Storage
- Usage
- Archive
- Deletion
DLM facilitates data management enormously in terms of reducing storage space, costs as well as supporting company compliance. Its main goals are saving storage space, ensuring compliance rules are met and preventing liability problems in advance.
Outdated project files, for example, waste a lot of storage space. And a human resources department must ensure that application documents are deleted on time. This is where a Data Lifecycle Management solution can help.
In this blog post, we will guide you through the most important topics surrounding Data Lifecycle Management!
Differences to Information Lifecycle Management
Often times, the terms Information Lifecycle Management (ILM) and Data Lifecycle Management are used interchangeably, and although it can also part of a data management practice, it is distinct from DLM.
Data Lifecycle Management monitors data at the file level, which means, it manages files based on type, size, and age. Therefore, it is sometimes also referenced as "file lifecycle management”.
ILM, on the other hand, manages the individual pieces of data in a file. For example, this can be data in a kind of database file or mailbox file. To do proper ILM, the used file format and the application domain must be known.
As a conclusion, Data Lifecycle Management can be done much more universally over the entire used file-based or BLOB-based storage, both on-premises and in the cloud.
What are the main goals of managing data lifecycle?
Saving storage space
In modern and digitalized companies, huge amounts of data are produced every day. Way too much data for a manual cleanup process.
However, if no one cleans up the data, it will accumulate over time and consume more and more storage space, not only on the storage server, but also in the backups. This increases costs and the time a full backup needs.
Therefore, managing data lifecycle allows taking back control over needed storage space by proactively setting a maximum lifetime for certain files from the beginning.
Compliance rules
Companies must comply with many regulations, especially when it comes to personal data in an application process.
The General Data Protection Regulation (GDPR) makes clear specifications for human resources departments. If an employment relationship is established, all data that is irrelevant to the performance of the job must be removed. In terms of a rejection, the GDPR sets a maximum for the retention period at 6 months.
The data protection authority can levy a hefty fine if a company fails to comply with this obligation. While a manual process carries the risk that mentioned deadlines will be missed, managing data lifecycle on the other hand can reduce this risk enormously.
Liability Issues
Companies that produce complex goods like trucks or ventilation plants, for example, generate a lot of data and logfiles during the process, that must be retained for a certain amount of years due to terms of liability.
In these terms it should be ensured that the data is retained a minimum amount of time, and is automatically deleted or moved to a cheaper archive storage when no longer needed.
With Data Lifecycle Management, administrators can directly assign an expiration date to files and documents. That way, the data lifecycle management system can automatically perform lifecycle management for all files without the need for manual steps through a system administrator.
Data Lifecycle phases explained
The lifecycle of a file consists of a series of 5 phases:
- Creation or Collection
- Storage
- Usage
- Archive
- Deletion
In this section, we will look at the various stages during the useful life of data.
1. Creation or Collection
The lifecycle of data simply starts with its generation.
This can happen in a variety of ways: Documents get created by a user, a log file gets created by an application server, or data is imported from another system.
2. Storage
The generated data is stored in files. This is the perfect moment to define the lifetime of a file, so that all further phases of DLM can be handled automatically.
3. Usage
During this phase, the data becomes available and is actively used by users or IT systems.
The data is supposed to provide a business value during this phase, otherwise it should enter one of the next phases to reduce the cost of storage.
4. Archive
After a certain amount of time, data is no longer useful for everyday operations. However, it can be important to maintain copies of such data for potential litigation and investigation needs.
In this case, it is often archived to a cheap and read-only storage. If required, the archived data can be restored to an active production environment. This phase is optional, for example, analytics data aggregated from other sources will be deleted if no longer needed by marketing.
5. Deletion
In this final stage of the lifecycle, the files are deleted from the storage to create space for new data. Data on the archive storage will be purged after a certain retention period.
How to manage lifecycle of data
After looking at the theory behind Data Lifecycle Management, we will focus on its practical implementation next. To manage lifecycle of data, professional software is needed that can accompany data through the 5 defined stages.
Here, we want to introduce you to SpaceObServer. SpaceObServer manages storage space database-centered and provides our very own solution for Data Lifecycle Management. In the following, we show you how to setup a DLM process with SpaceObServer. You can follow this guide with the free trial version if you like – no registration needed.
Setting up SpaceObServer for DLM
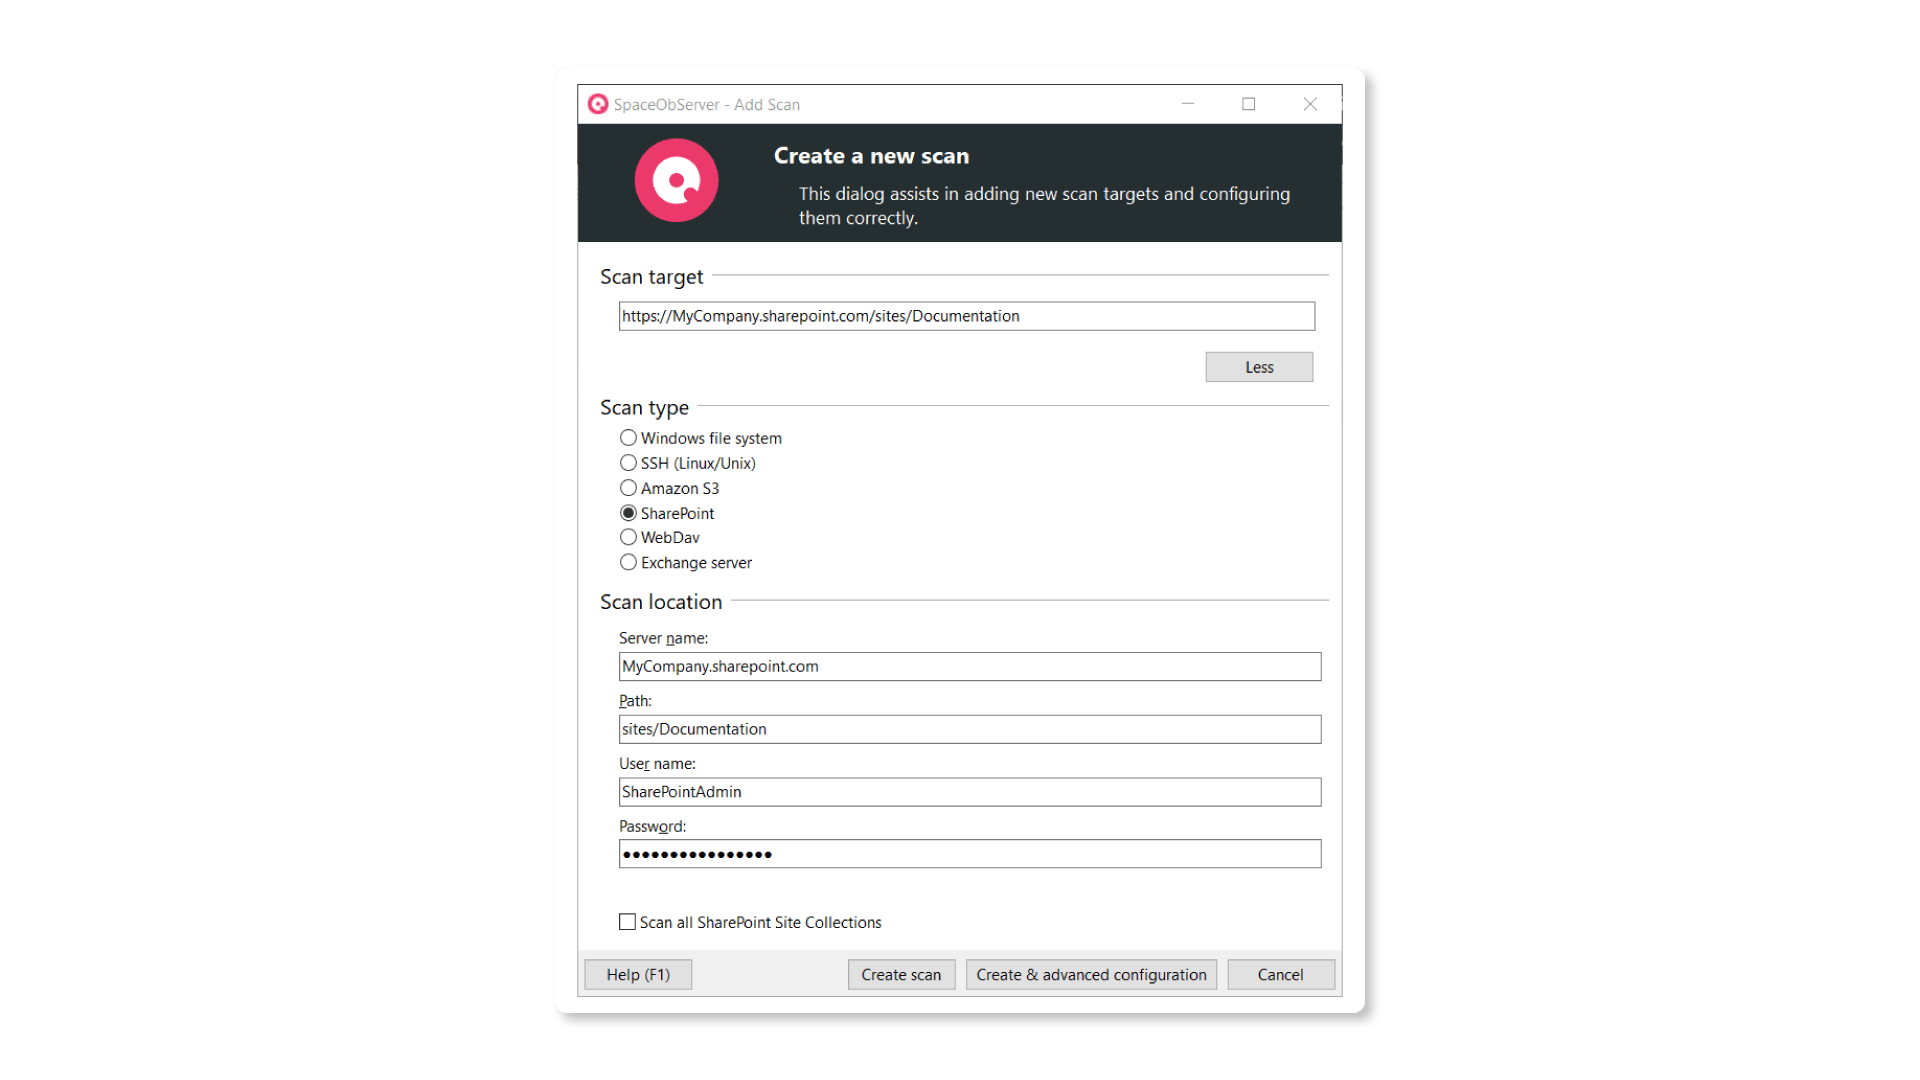
First things first. To perform DLM with SpaceObServer, start by setting up a regular server scan on your server. Windows server, SharePoint, Amazon S3 Cloud Storage and Linux server are supported.
Once the scan is created, open the scan settings and add a new post-scan action here.
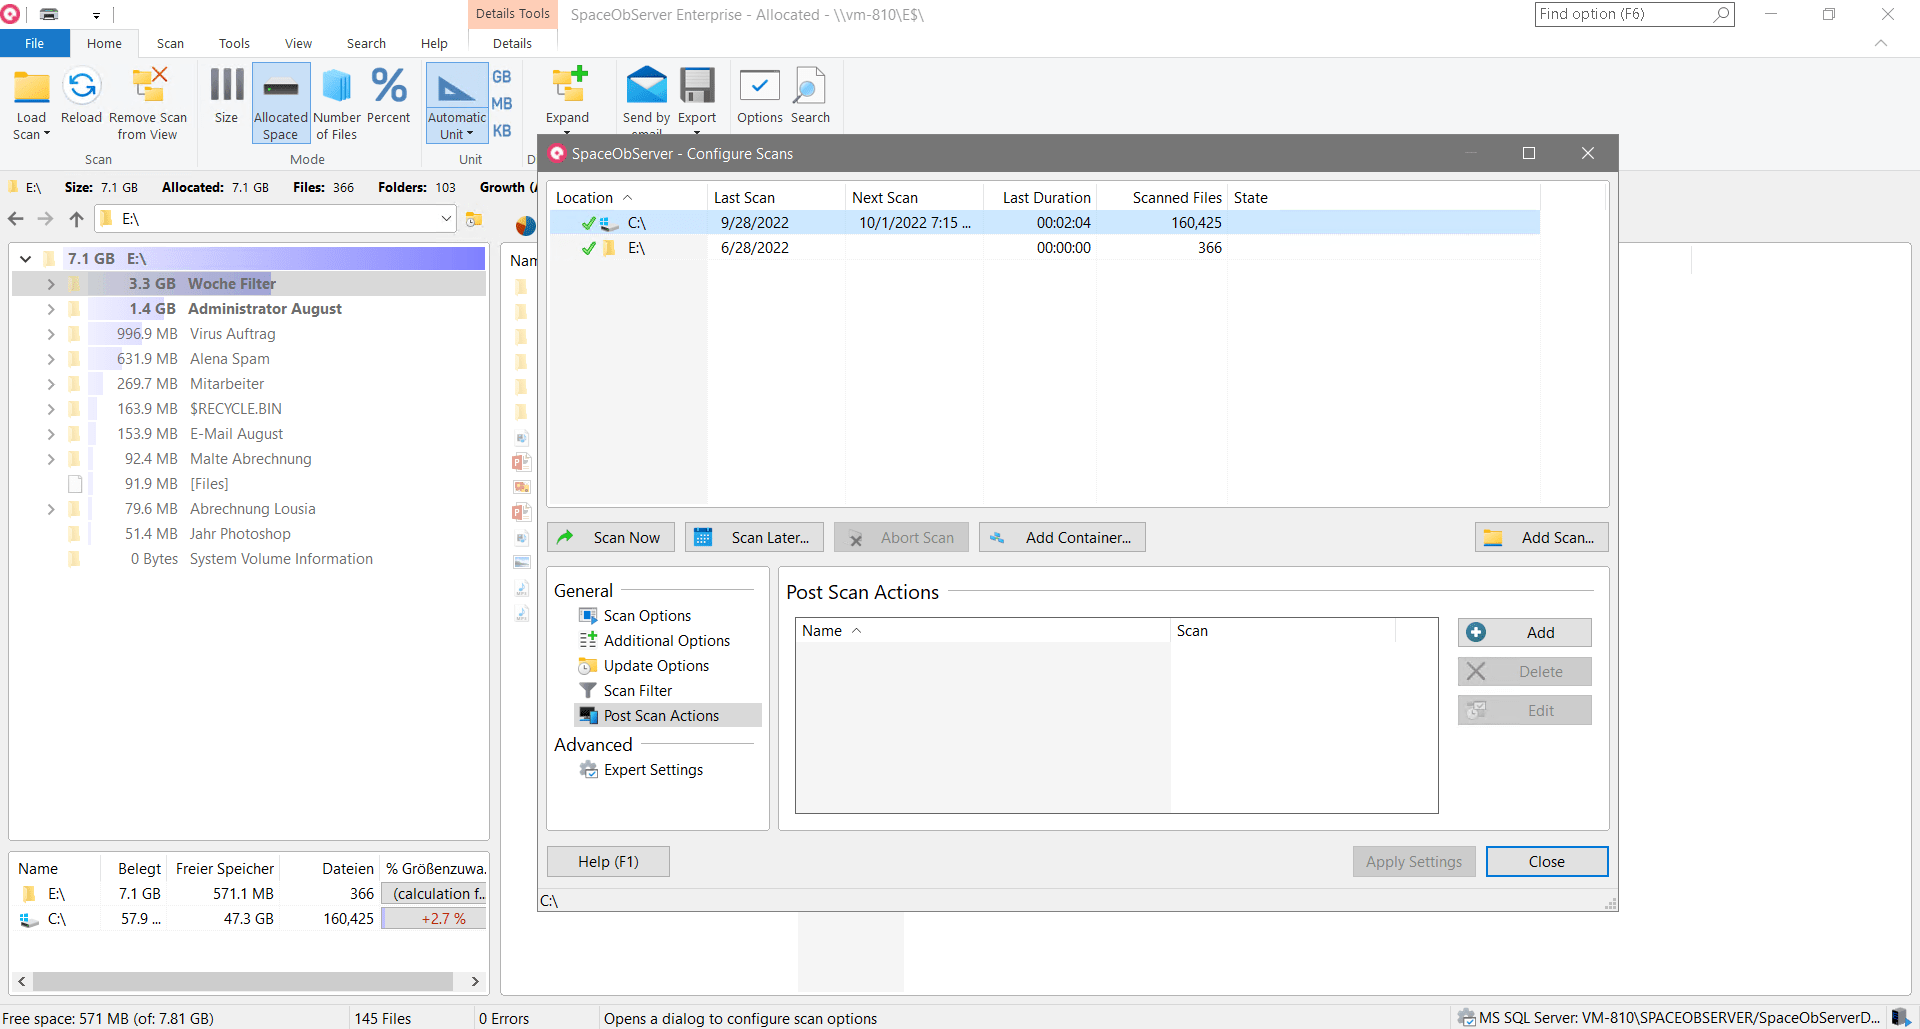
In the post-scan actions, various tasks can be defined that are to run automatically after a scan - for example, an export of scan results.
The "Lifecycle" setting can also be found here.
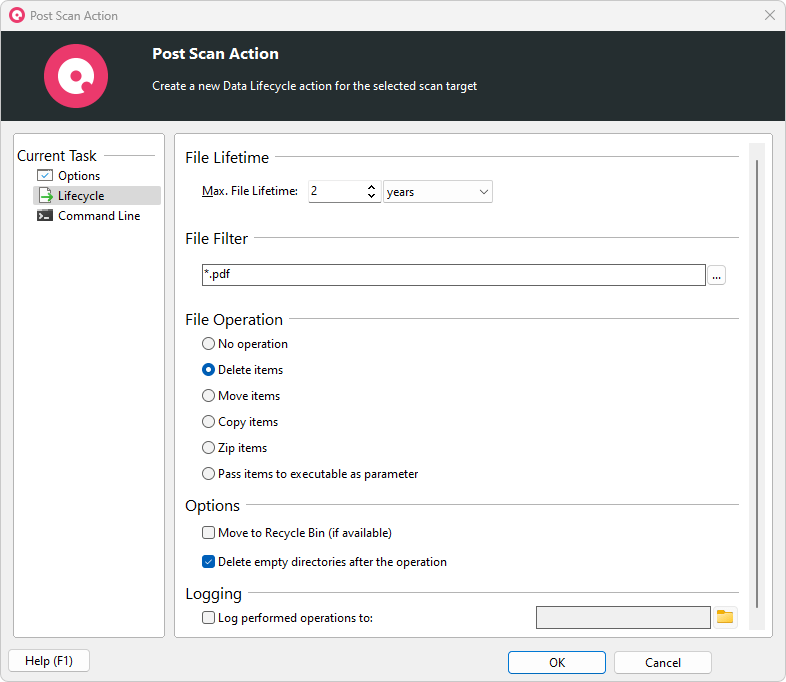
Setting up a maximum lifetime for files follows a simple logic in SpaceObServer where you have to answer three questions:
- How long should the files exist at maximum?
- Which files should be affected by this rule?
- What exactly should happen when the lifetime has expired?
1 Define maximum file lifetime
We define the maximum lifetime at the very top with an integer. We can choose from the time periods days(s), week(s), month(s) or year(s). In our example, we want to delete all application files older than 6 months.
2 Define affected files
Now we need to specify which files should be affected by the rule. This can be done very precisely thanks to the powerful filter function of SpaceObServer.
The most common format for applications and resumes is PDF. So, let's create a filter that affects all PDF documents in the "Applications" subfolder on the Human Resources file server (\\DataServer\staff\applications).
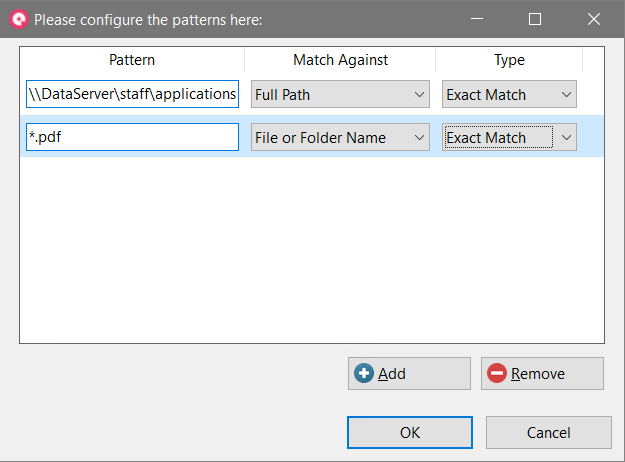
Now the rule only affects the correct files.
3 Delete old files automatically
Finally, we define what should happen with the application files after the 6 months have expired. For this purpose, there are several different file operations available in SpaceObServer.
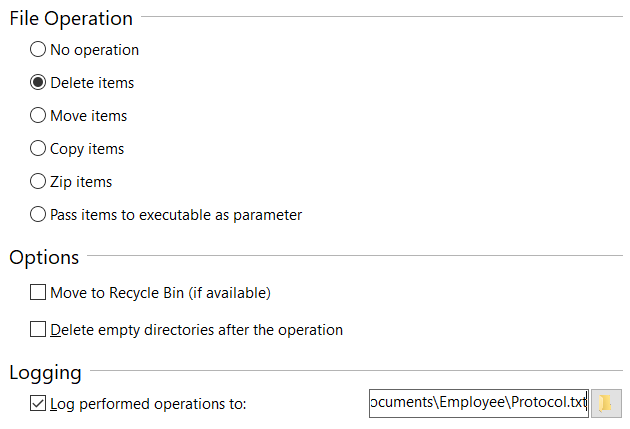
In this example, let's decide to delete the documents. Conveniently, in the other options, you can directly set that empty folders are also deleted directly after the process is completed.
We also recommend that you record a location for logging the deletion process. This helps to keep track of exactly what was removed and when.
Now just confirm with "Ok". The setup is finished. SpaceObServer will now execute the process automatically after each scan according to your schedule.
Archive files automatically and save money
In addition to making provisions for better compliance, Data Lifecycle Management can also help free up expensive storage space.
If it's not small PDFs like in an application process, but larger files like in a 3D modeling project, for example, it can add up to quite a bit of storage space.
Especially if you rely on the cloud, it then quickly becomes expensive. But purely for budget reasons, relevant project folders can of course not be deleted.
In this case, we recommend archiving old files. To do this, we move large project files out of the cloud to a cheaper location after a set period of time. For example, nearline storage or even cheaper archive storage can be used.
This way, we don't have to delete any relevant data and save valuable storage space at the same time.
So, as usual, let's set a maximum lifetime for the corresponding project files and then select "Move items" in the file operations. Here, we can specify in the options exactly to which destination the files should be moved.
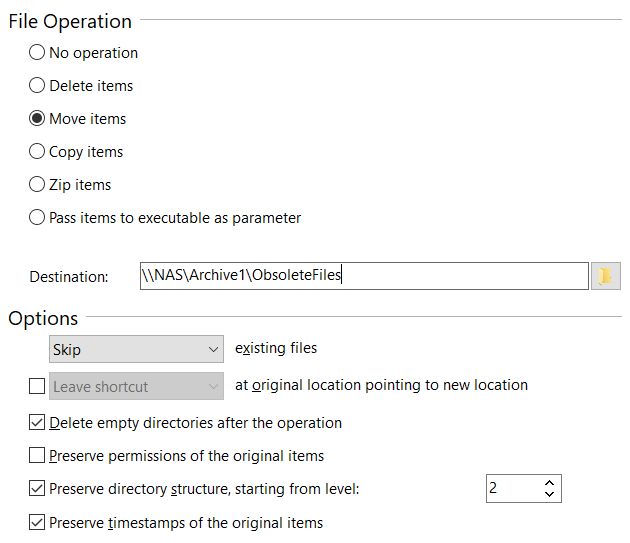
Besides, it is also possible to set exactly what should happen to already existing files, whether empty folders should be deleted afterwards, from which level the directory structure should be preserved and much more. Set the operation exactly as you need it.
Try Data Lifecycle Management for yourself
In this blog we have clarified what Data Lifecycle Management is and how you can use it to improve your compliance and save costs. SpaceObServer is happy to help you with your data management needs.
Would you like to try it out for yourself? We offer a free and fully comprehensive trial version for SpaceObServer. Try SpaceObServer for free now!
Want to always stay up to date? Subscribe to our newsletter now!
Do you like what you've just read, have new ideas or feedback? Visit our contact form and let us know your thoughts!