


Data Lifecycle Management in 3 Steps
Are you having trouble organizing data on your storage systems over a long period of time? Reclaim your time and let a Data Lifecycle Management process do it for you.
With SpaceObServer, you can easily accompany your data throughout its whole lifecycle in 3 easy steps. It's easy to set up and easy to maintain. Just answer following questions:
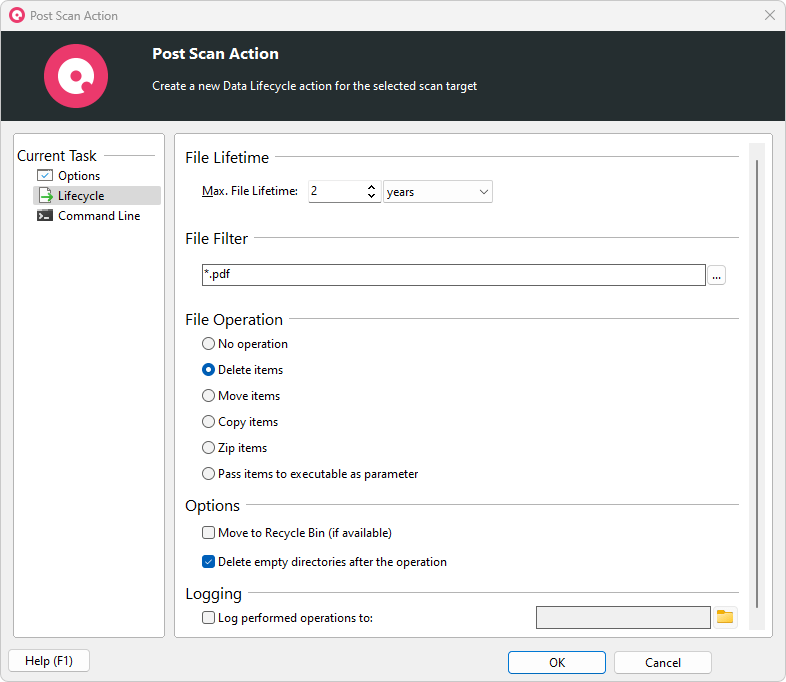
1. Which data?
Use filters to determine exactly which data or information should be considered.
2. How long?
Set the maximum lifetime measured by the creation date of the files.
3. What should happen?
Determine whether SpaceObServer should delete, move or archive affected information. Other operations are also possible here.
SpaceObServer is trusted and loved
With SpaceObServer, we finally have the possibility to visualize for our employees where which amounts of data are located, in a clear and easy way. Now we know where our 'graveyards of data' are hidden. Using SpaceObServer, we are capable of continuously monitoring and systematically optimizing our disk space - with minimal effort and low costs.
Set up your continuous data processing
Show transcription
[On Screen: Intro: the SpaceObServer logo with a chapter list (Scan Targets & Schedule, Statistics Overview, Disk Growth History, File Filter, Post Scan Actions), highlighting “Post Scan Actions”.]
Do you already monitor server disk space continuously? Then let SpaceObServer create reports automatically and export them regularly. The SpaceObServer post-scan actions make it possible. With SpaceObServer Enterprise, you can create descriptive reports that you can easily forward to your superiors, for example. With post-scan actions, you can automate the reporting process.
[On Screen: The “Post Scan Action” dialog (“Create a new Post Scan Action”), opened from the scan configurations; the scan target is selected in the list and, under General, Post Scan Actions is chosen and added.]
To set up a new post-scan action, open the scan settings in the Scan ribbon or via the small icon next to your target path. First, select the scan target in the list for which you want to set up a post-scan action. Then select Post Scan Actions under General and click on Add.
[On Screen: The Options tab of the report: column sorting and size unit, the option to apply the interface default, the expand level, and a filter to omit elements (for example files that are too small).]
Now configure your report individually. Under Options, you make basic decisions about your report. Below that, set the column sorting and the size unit to be used. Here you can apply the default setting from your user interface to your report, or make your own setting. You can also set the expansion of your report to the level you need it to be. Here's a quick tip: depending on the use case, you should define a limit so that the report stays clear. Of course, you can also filter out certain files here from the start, for example if they are too small. Configure a filter here that fits your needs.
[On Screen: The export settings: a generic name (which can carry the scan date) and export formats — Excel, CSV, HTML, XML or PDF — plus an option to send the report by email once the scan is completed.]
Now switch to the export settings. Besides setting a generic name, which for example carries the date of the scan, you can specify different export formats here. Choose from Excel and CSV, HTML, as well as XML or a simple PDF. Very handy: in addition, you can also have the report sent to you by email as soon as the scan is completed.
[On Screen: The report contents: detailed results such as the largest files or found duplicates, and a choice of graphics (pie chart, treemap chart, bar chart, or a history).]
Include detailed results, like the largest files or all found file duplicates, in your report. The reports only become really informative with a suitable graphic. Choose from various graphics, for example pie charts, treemap charts, bar charts, or even a history.
[On Screen: A small dialog shows the finished scan settings as a command line, which can be copied to the clipboard or saved as a batch file; finally a name is entered for the new post-scan action.]
A small tip for power users: SpaceObServer also gives you the finished scan settings as a command line. You can simply copy this command to the clipboard or save it directly as a batch file to a suitable location. That's it. All that's missing is a suitable name for your new post-scan action, and you're done.
[On Screen: The list of Post Scan Actions, where they can be changed or deleted later.]
The scan actions can then be viewed in the list. Here you can also change or delete them later. SpaceObServer now automatically creates an informative report for your regular scan. Do you want to try the post-scan actions on your own server? Then try our free 30-day trial version of SpaceObServer.
[On Screen: Closing screen with the SpaceObServer logo, the chapter list, and a “30 Days Free Trial” button.]
Your server storage under observation
Any questions left? Book a call now and get the free trial!

SpaceObServer DataCentral

SpaceObServer Enterprise
Frequently asked questions
What is SpaceObServer?
SpaceObServer is the storage management and reporting solution for your servers. It observes storage on your system continuously and archives file system information in a SQL database.
What's the difference between TreeSize and SpaceObServer?
While TreeSize can show its full strength when scanning smaller systems, SpaceObServer is the solution for medium to large server landscapes.
TreeSize scans file system structures as needed and holds a snapshot of the scan in your system memory. SpaceObServer, on the other hand, archives all needed file system information in a backend database to calculate size development.
SpaceObServer shows you detailed statistics from the start and lets you apply filters without the need of any rescan.
See our comparison for more information:
Which storage systems does SpaceObServer support?
SpaceObServer can observe Windows servers as well as SharePoint, Amazon S3 Cloud Storage, Azure Blob Storage and Linux/Unix server systems.
Does SpaceObServer transmit sensitive data?
No, SpaceObServer does not transmit any kind of sensitive data from your storage systems.
SpaceObServer collects file system information only locally in the scan database.
Do I need SpaceObServer DataCentral or Enterprise Edition?
SpaceObServer offers two editions: DataCentral (former: Standard Edition) and Enterprise.
DataCentral is your solution for simple scanning of multiple storage systems without the need for automation.
With the Enterprise Edition, on the other hand, you can scan multiple servers and benefit from automated reporting, Data Lifecycle Management as well as OLE Automation.
See our comparison for more information.
Does SpaceObServer require a license for access?
Yes, SpaceObServer does require the SpaceObServer Client Access Single License, comparable to a CAL.
But every purchase of SpaceObServer regardless of the edition comes with a SpaceObServer Client Access license.
Additional clients beyond this single access license do require licensing via the SpaceObServer Client Access Add-On. It also includes the Remote Client for SpaceObServer as an additional software.