

How To Set Up SpaceObServer
Step by step to productive storage monitoring
SpaceObServer continuously monitors your storage environment - both locally and in the cloud.
But how do you set up SpaceObServer optimally in order to use all functions efficiently?
In this guide, we will take you step by step from installation and the planning of regular scans through to automated reports and data lifecycle rules.
This article is right for you if you are currently preparing a free trial for SpaceObServer or are gaining your first experience with the software.
What SpaceObServer does for complex IT environments
Before we get into the setup, let's look at what SpaceObServer essentially does for you:
SpaceObServer continuously and automatically records storage information down to file level - across local servers, network drives and cloud storage. The data is stored historically to identify developments and trends.
It scales with your environment and supports distributed instances to create ideal conditions for monitoring hybrid IT environments in multiple locations, countries or continents.
SpaceObServer lets you create detailed reports according to your needs on regular basis and export it in various formats.
Rule-based Data Lifecycle Management helps you monitor and control storage efficiently to optimize resources or meet compliance needs.
Set up system requirements, installation and scan service
Before you start the installation, please check the system requirements.
Set up the scan service: Choose your user account wisely
The Scan Service is the heart of the SpaceObServer and ensures regular storage space monitoring. It is therefore particularly important that you configure the Scan Service correctly.
During the first installation, SpaceObServer asks which user account should be used for the scan service. This account controls access to all storage locations that are to be scanned.
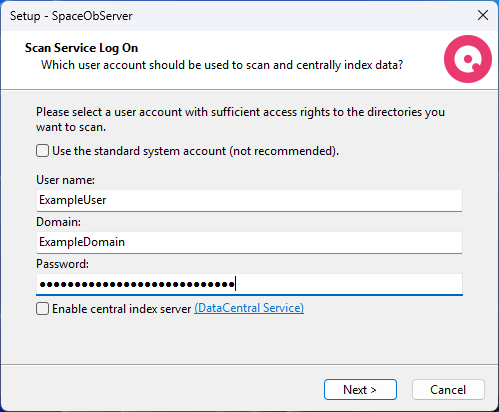
We recommend a dedicated service account with clearly defined rights in your Active Directory environment.
This account should:
- Have access to all relevant storage locations
- Have "Register as service" authorization
- Have write access to the database (important for Windows authentication to the database)
Alternatively, you can use the standard Windows service account. For more complex environments, you can also use individual accounts for specific scans later in the setup process.
Important: An account with insufficient rights leads to error messages.
Choose the right database
After installation, SpaceObServer prompts you to set up a database. All scan data is saved here and then made available for evaluations and reports.
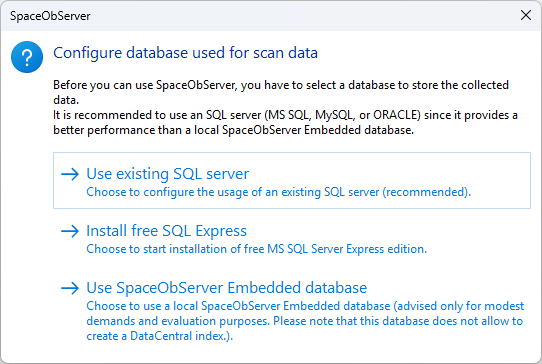
There are three options to choose from:
SQL Server (recommended for productive use)
Ideal for large data volumes, high scanning frequency and multi-user environments. Microsoft SQL Server (incl. Express) and MySQL are supported.
For productive installations, we strongly recommend a dedicated SQL server with remote access - especially for multiple scan targets and distributed teams.
Tip: In our online store we offer a discounted Microsoft SQL Server Runtime Edition as an option to be purchased along with SpaceObServer
Microsoft SQL Server Express (up to 10 GB data limit)
Suitable for smaller environments or initial pilot projects. Our manual contains step-by-step instructions how to migrate to a full SQL server later.
Embedded database (for test purposes only)
This variant works out of the box, without any downloads or configurations. It is therefore ideal for testing purposes (e.g. on your local PC).
However, it is not suitable for productive use beyond the test phase - it scales poorly and reacts sluggishly to large amounts of data. We therefore strongly advise against this variant for productive use.
Setup and Schedule storage scans
Once the database is set up, you can set up your first continuous storage.
Select scan target and scan type
SpaceObServer supports a wide variety of storage systems such as Windows drives, network drives, SharePoint, Amazon S3, Azure, Linux via SSH and many more.
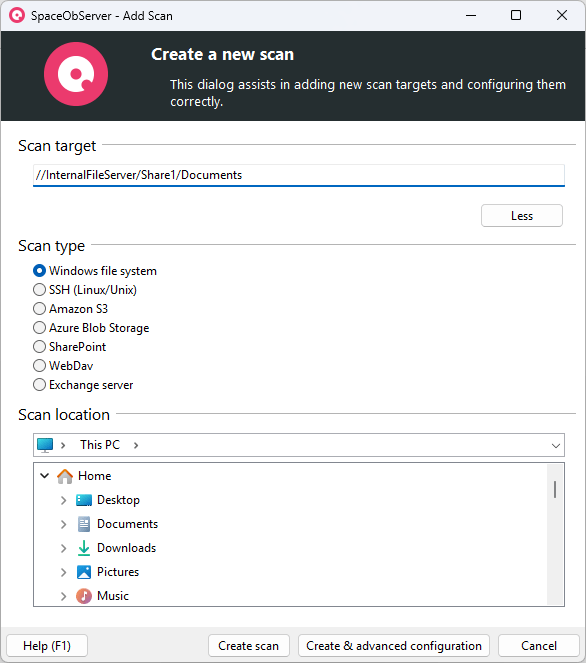
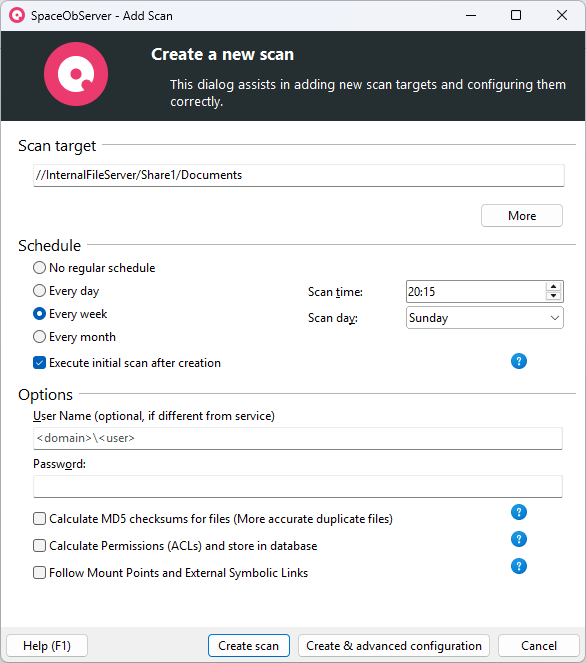
In the first step, click on "Add scan" in the "Scan" ribbon bar.
You can now either enter a target path directly or select a scan type under "More". SpaceObServer automatically recognizes the storage type and offers the appropriate options.
Recommended settings (optional):
- Analyze NTFS permissions: Activate "Calculate and save access permissions (ACLs)" if you want to additionally store all permissions to analyze them later.
- Detect file duplicates: Calculate MD5 checksums" can be used to find duplicate files - helpful for cleanup processes or storage optimization.
Note: Both options increase the scan time considerably in some cases. You can also activate these settings later for each scan as soon as your basic structure is in place.
Determine schedule and initial scan
Then define how often SpaceObServer should monitor the selected target:
- Daily, e.g. at night
- Weekly, e.g. at the weekend
- Monthly, e.g. at the end of the month
To distribute network load, we recommend scanning times outside office hours - e.g. during the night or the weekend.
Activate the option "Start initial scan immediately" if you want that SpaceObServer performs the first analysis immediately after saving the settings.
Important: The first scan takes longer, as all data is initially transferred to the database in full. From the second scan onwards, SpaceObServer only processes changes - this saves time and resources.
Bringing order to complex environments using containers
As soon as your first scans have been set up, you will see them in the "Configure scans" dialog. Here you will see an overview of all configured scans including nest schedule, last runtimes and status.
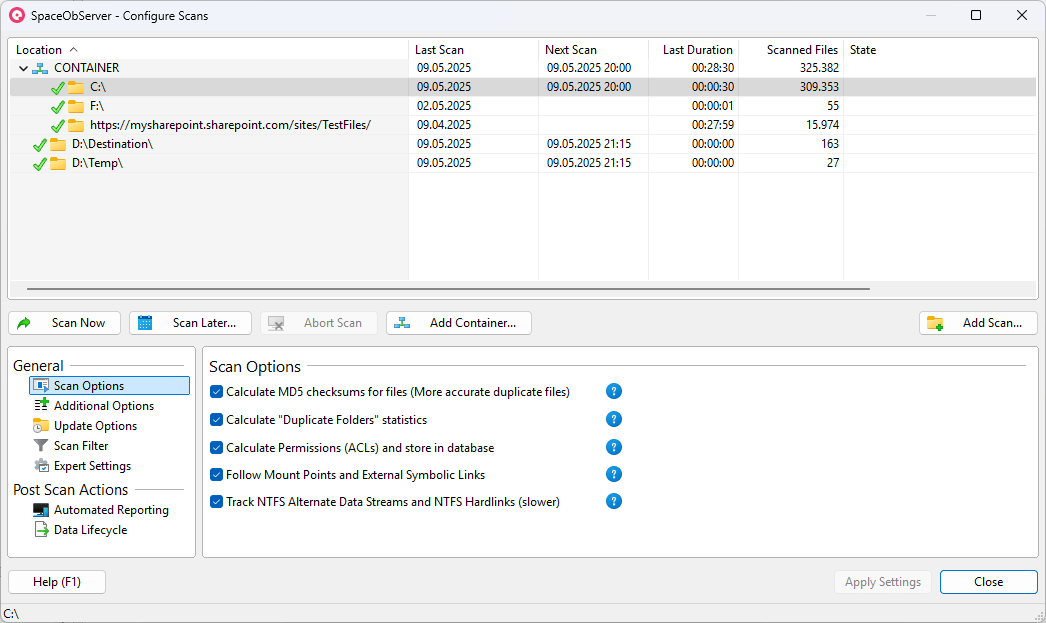
If you have created several scans - which is quickly the case in larger environments - it is advisable to organize them in containers.
Containers serve as a thematic bracket and help to maintain an overview even in complex environments.
Examples of useful container structures:
- By storage location: e.g. "SharePoint Online", "FileServer South", "S3 archiving"
- By area of responsibility: e.g. "HR & Legal", "Product Development", "External Storage"
- By scan target type: e.g. "Cloud storage", "On-premises", "Mailboxes"
Tip: Coordinate the container structure with related areas such as teams. Opening containers allows you to analyze different storage locations together, such as searching for duplicate files within areas of responsibility.
Automatically create powerful reports
Regular storage analyses are only helpful if the results are distributed in a targeted manner. SpaceObServer can automatically generate and send reports immediately after a scheduled scan is completed.
Activate automated reports
To set up an automatic report, open the "Automatic reports" item in the respective scan under "Scan settings" > "Post-scan actions" and click on "Add".
You can define several reports per scan - e.g. for different recipients or data areas. This saves time and ensures targeted communication within the company.
Best practice: Set up the report configuration immediately after the first scan to ensure that automated reports are sent to you right from the start.
Define content, formats and recipients
SpaceObServer offers you many customization options for your reports.
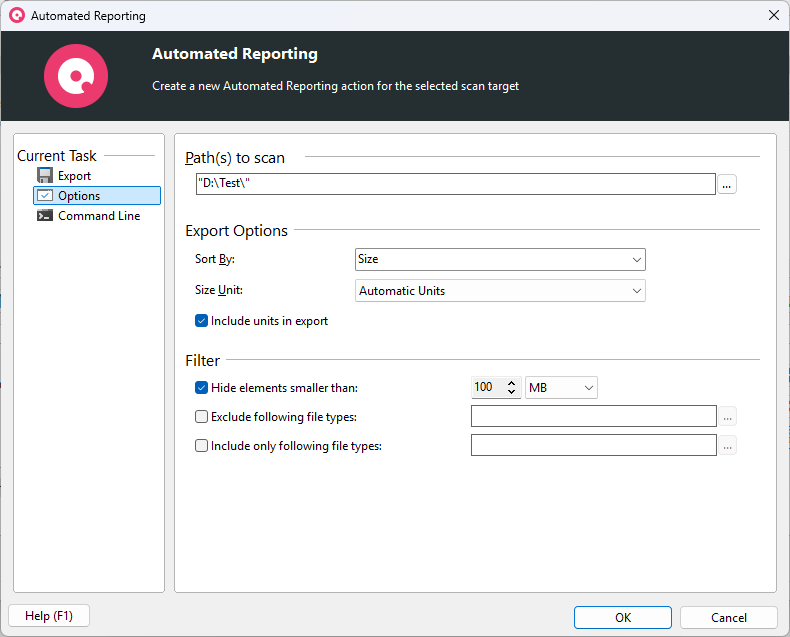
- Data structure: Specify how deep folder structures should be exported.
- Sorting & filtering: Focus on large directories or specific file types.
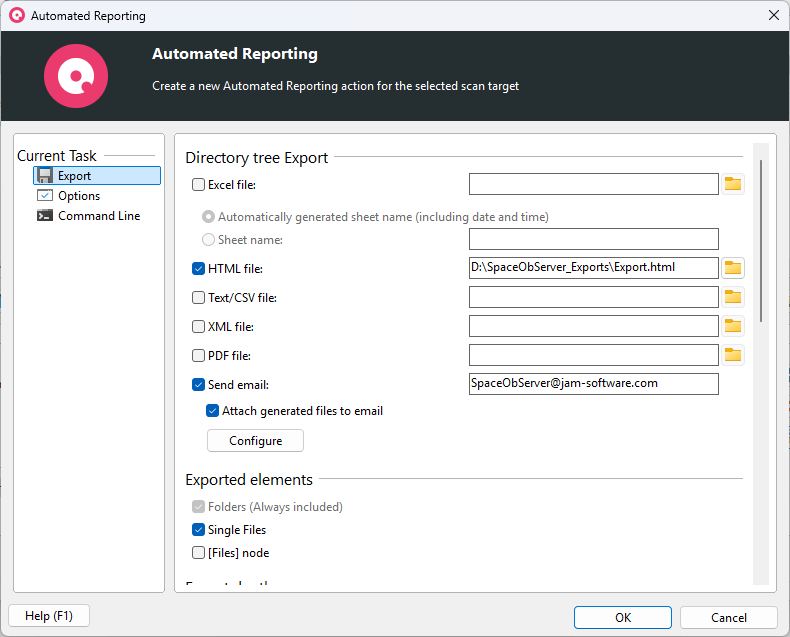
In the "Export" area, you determine the output format:
- PDF: ideal for fixed reports to management or specialist departments
- Excel/CSV: for further processing in analysis tools or for manual evaluation
- HTML (interactive): for clear presentation in the browser with click options
- E-Mail: All files generated through above options will be sent as an attachment. You may omit the file names if you choose this option.
- Charts & tables: Select which visualized key figures should be included in the report.
Set up and operate Data Lifecycle Management
In addition to the automatic generation of reports, SpaceObServer also allows you to set up Data Lifecycle Management (DLM).
What data lifecycle management does with SpaceObServer
With each analysis, SpaceObServer not only recognizes what is available, but can also automatically identify and clean up obsolete files - a decisive advantage in productive operation.
Examples:
- Automatic archiving or deletion of files older than X years.
- Deletion of certain file types in defined storage areas, like log files or temporary files.
This reduces the burden on your IT, improves data quality and actively supports compliance with guidelines such as the GDPR.
How to configure DLM rules
You can find the DLM function in the "Scan settings" > "Lifecycle".
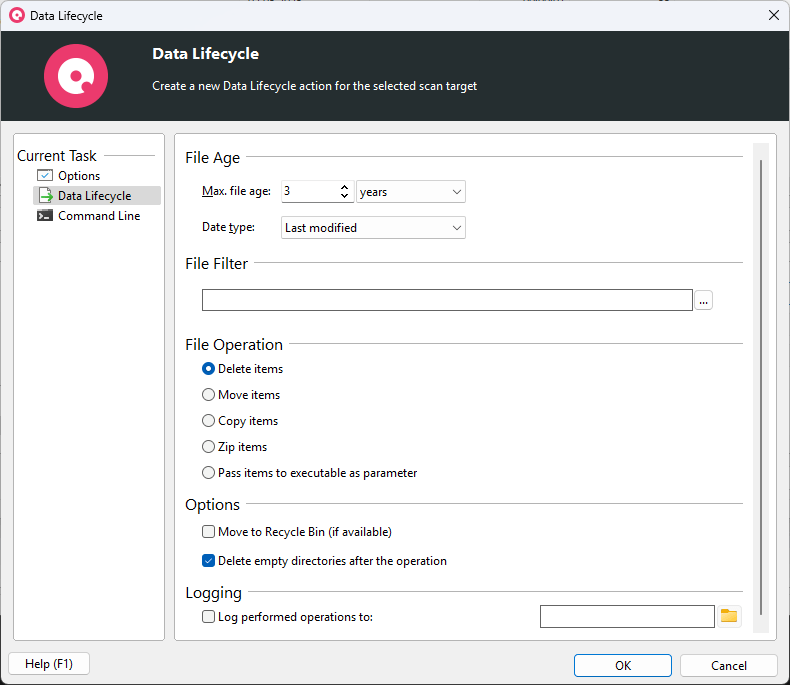
Each rule consists of three elements:
- Define the maximum age in days, months or years.
- Define which files should be affected: Set an include filter, limiting by path, or file extensions.
- Define action: Select from file operations such as delete, archive or move with the appropriate options, such as preserving the directory structure or retaining timestamps.
These rules are executed automatically after each scan - without manual intervention.
Distributed access with the Web Access and Remote add-ons
Especially in larger teams or distributed organizations, it is worth taking a quick look at the SpaceObServer add-ons.
These significantly expand the possible applications and relieve central administrators.
Web Access: Makes storage reports accessible via the browser - ideal for giving specialist departments insight into their own data and allowing them to mark data for archiving, for example.
No installation on the clint systems I necessary and Windows authentication is used.
Client Access: Enables several IT employees to access the scan data and the central configuration of SpaceObServer from their local PC using a fully featured desktop app that integrates well with the Windows Explorer.
These add-ons are particularly useful for organizations with several IT managers or if specialist departments are to be more closely involved in storage management.
Tips to avoid common mistakes
To make the setup of SpaceObServer as easy as possible, we have compiled the three most important tips for successful troubleshooting in this section.
Scans do not start as expected
Symptom: After setup, nothing happens during the scan - there is no start or no visible activity.
Possible causes:
- The SpaceObServer scan service is not running.
- The database connection has not been saved correctly or does not have sufficient rights.
- The service is running under account with insufficient privileges (e.g. "local system" without access to the database).
- An incorrect monitoring server is entered in the expert options.
Solution:
Check whether removing the monitoring server in "Scan" > "Configure scans" > "Expert options" solves the problem.
Open SpaceObServer as administrator and check under "File" > "Options" > "Service" whether the scan service is active. If not, start it manually.
Also check the database settings under "File" > "Options" > "Database"
Important: Settings must be made in Admin mode so that they can be assigned to the service.
If you are using Windows authentication with an SQL server, make sure that the service is running under a user account with the appropriate authorizations - not under the local system account.
Access denied - scan aborted
Symptom: The scan aborts with the message "Access denied".
Possible causes:
- The service account used does not have access to the storage path.
Solution:
Go to "Scan" > "Scan Settings" > "Expert Options" and specify an alternative user account that has read access to the scan destination.
If no specific user account should be defined, check under "Windows services" whether the SpaceObServerAgent is running under a suitable account. This account requires read access to the scan target.
Problems with the database connection
Symptom: SpaceObServer cannot establish a connection to the database.
Possible causes:
- Database provider missing (e.g. MySQL ODBC driver).
- Encryption (SSL) is required but not configured.
- Server or database name was entered incorrectly.
Solution:
- Check whether the error message mentions a missing provider. If this is the case, you can find help in our FAQ.
- If the error message mentions the "SSL provider", activate data encryption in the database connection options.
- Check the details for local installations (e.g. MySQL): The server name is often simply "localhost".
Further sources and help with setup
The tips in this article will give you a solid foundation for setting up SpaceObServer productively in your environment.
If you would like support at any point or would simply like to get started together with an experienced product consultant, we will be happy to help you:
Book a live session now - we will set up SpaceObServer together with you and answer your individual questions.
Further help is also available from our support chatbot and our Knowledgebase, as well as the SpaceObServer online help.
We look forward to assisting you with the introduction of SpaceObServer!