


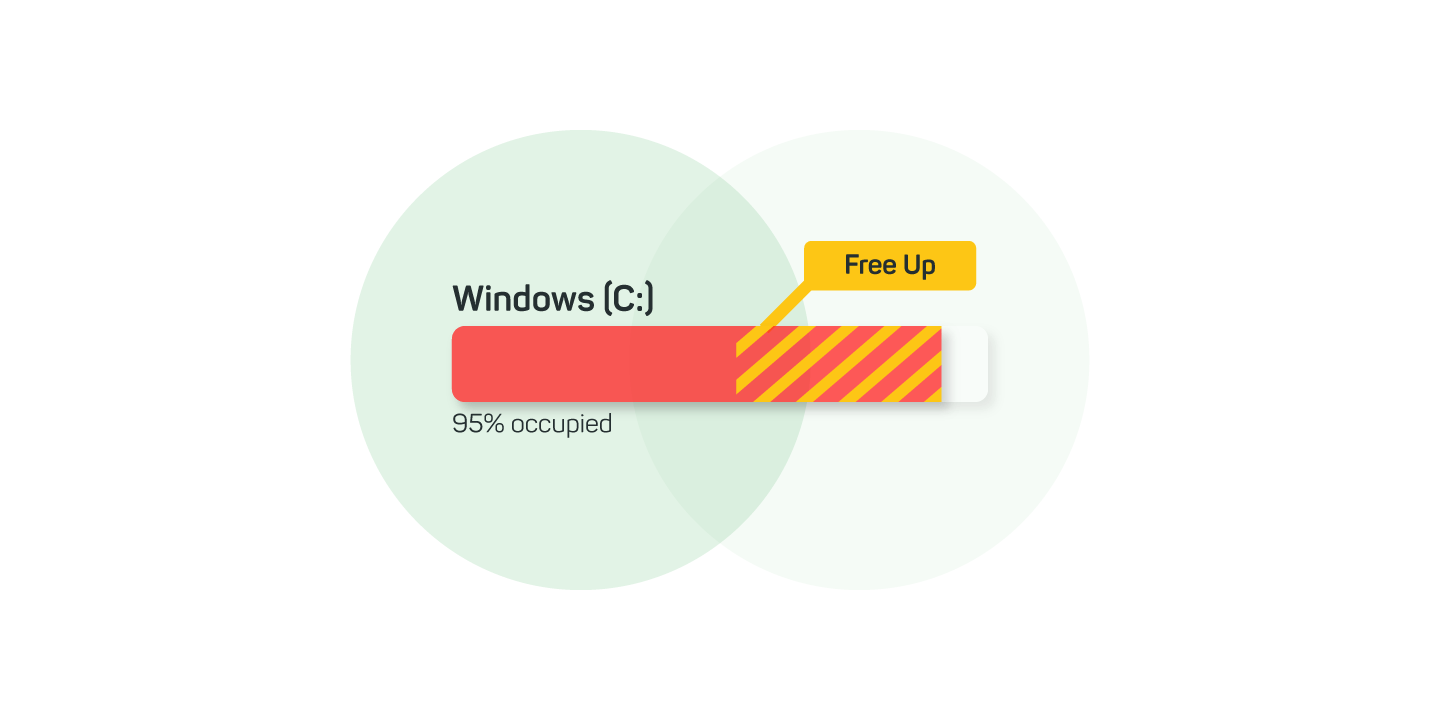
Find Out Where Your Disk Space Has Gone!
More Clarity: Visualize Storage Usage & Find Space Hogs
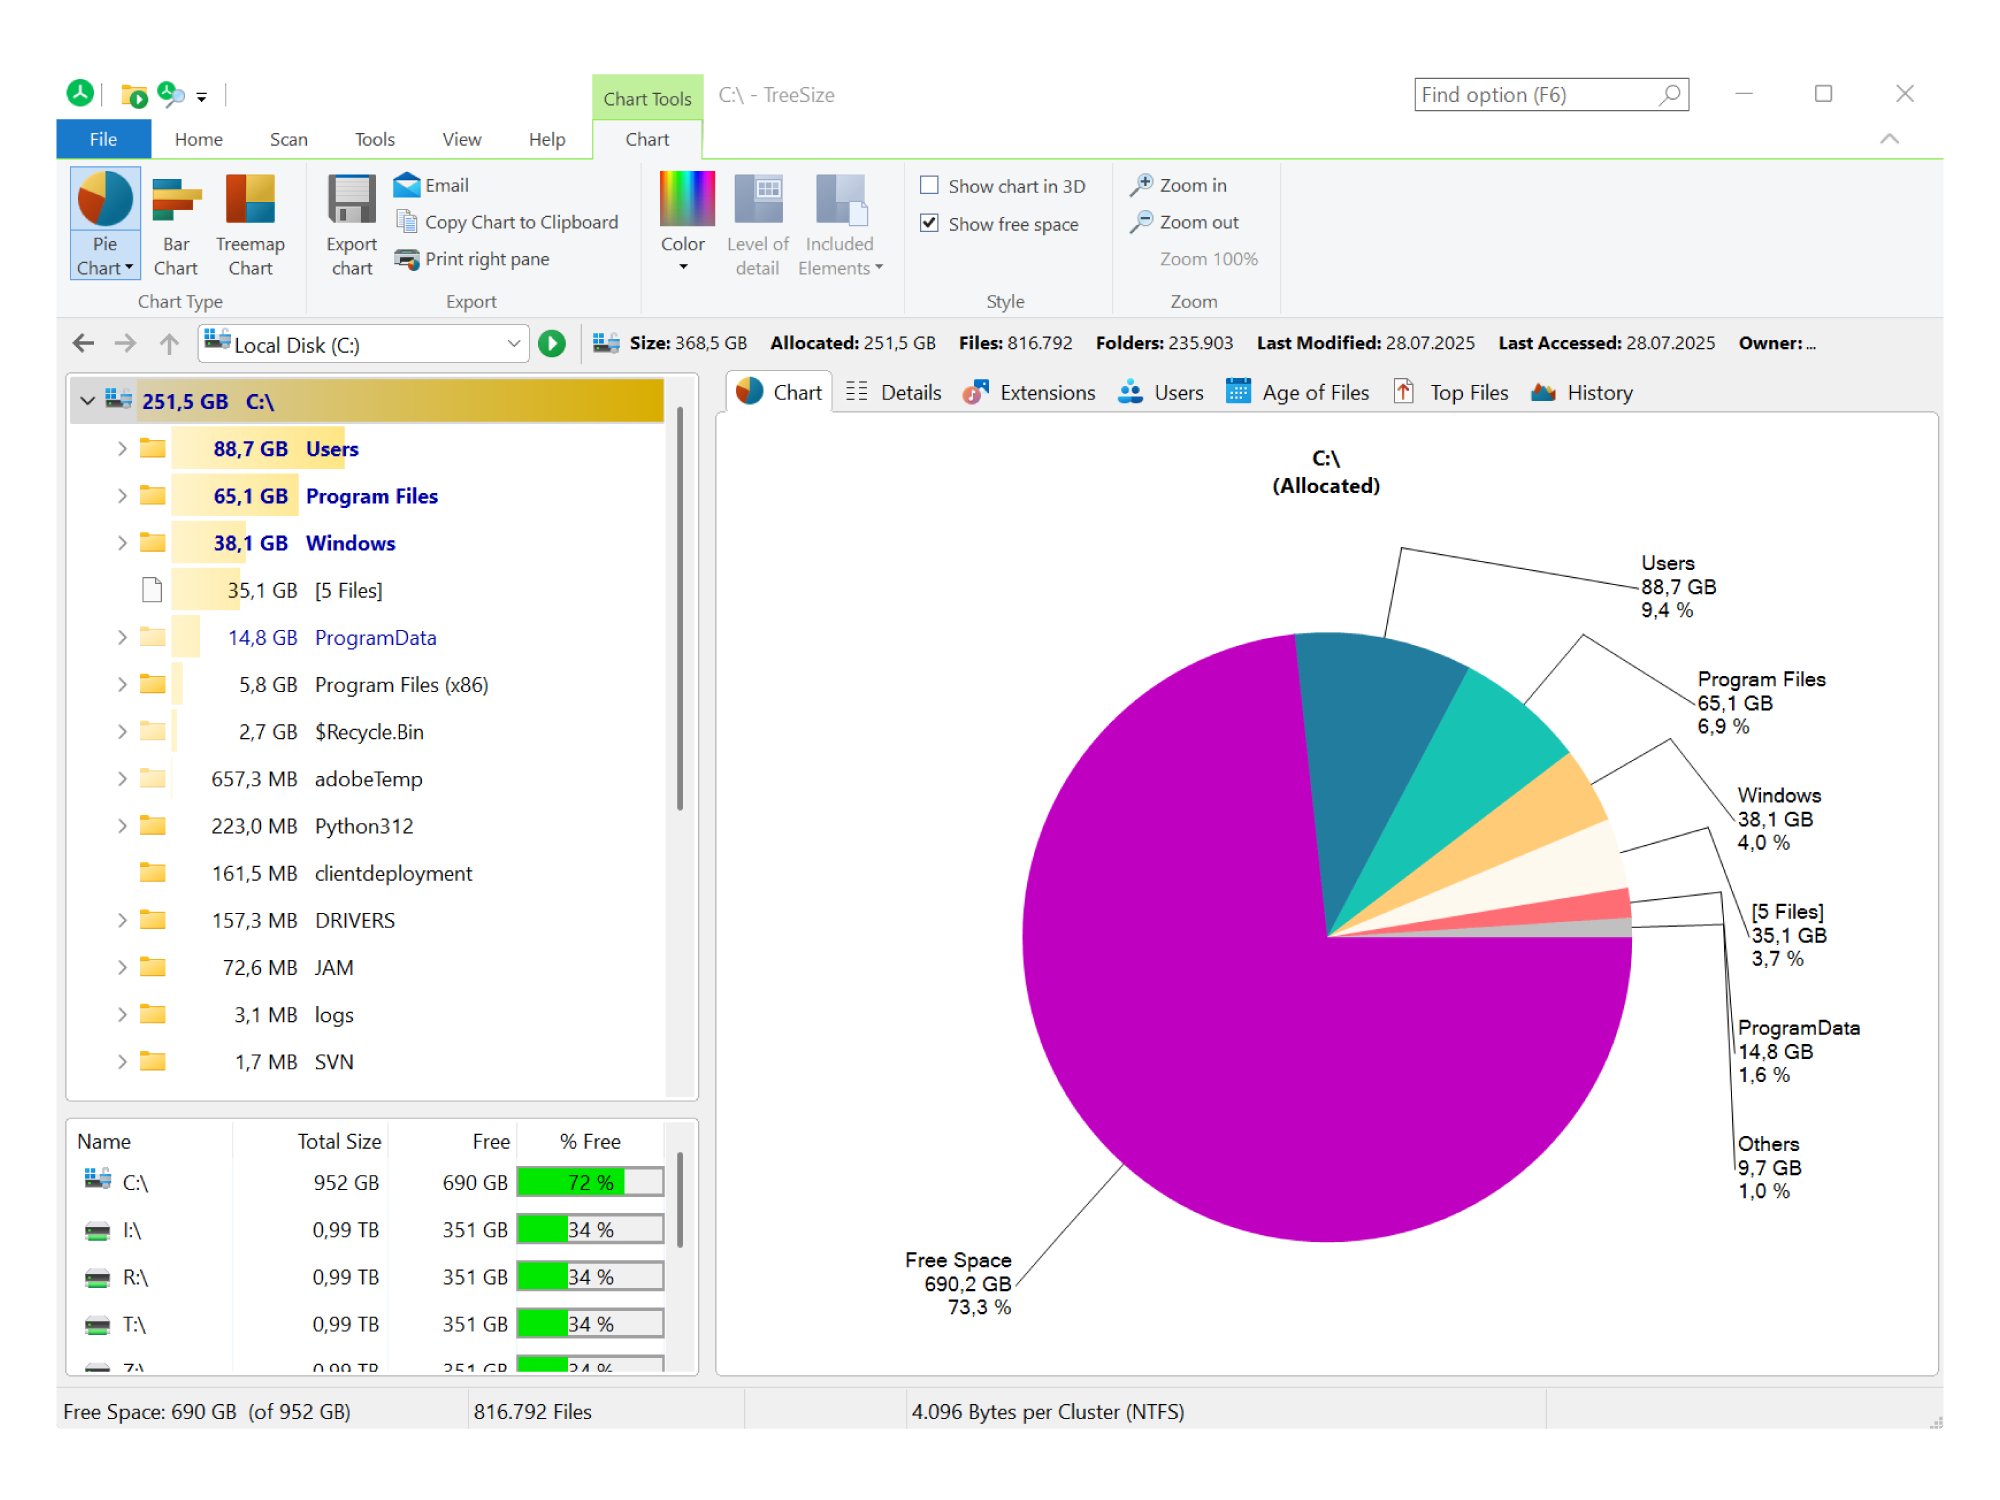
Stop guessing where your disk space has gone. TreeSize provides intuitive visualization tools that help you make smarter storage management decisions, including:
- Windows Explorer-like interface for easy navigation
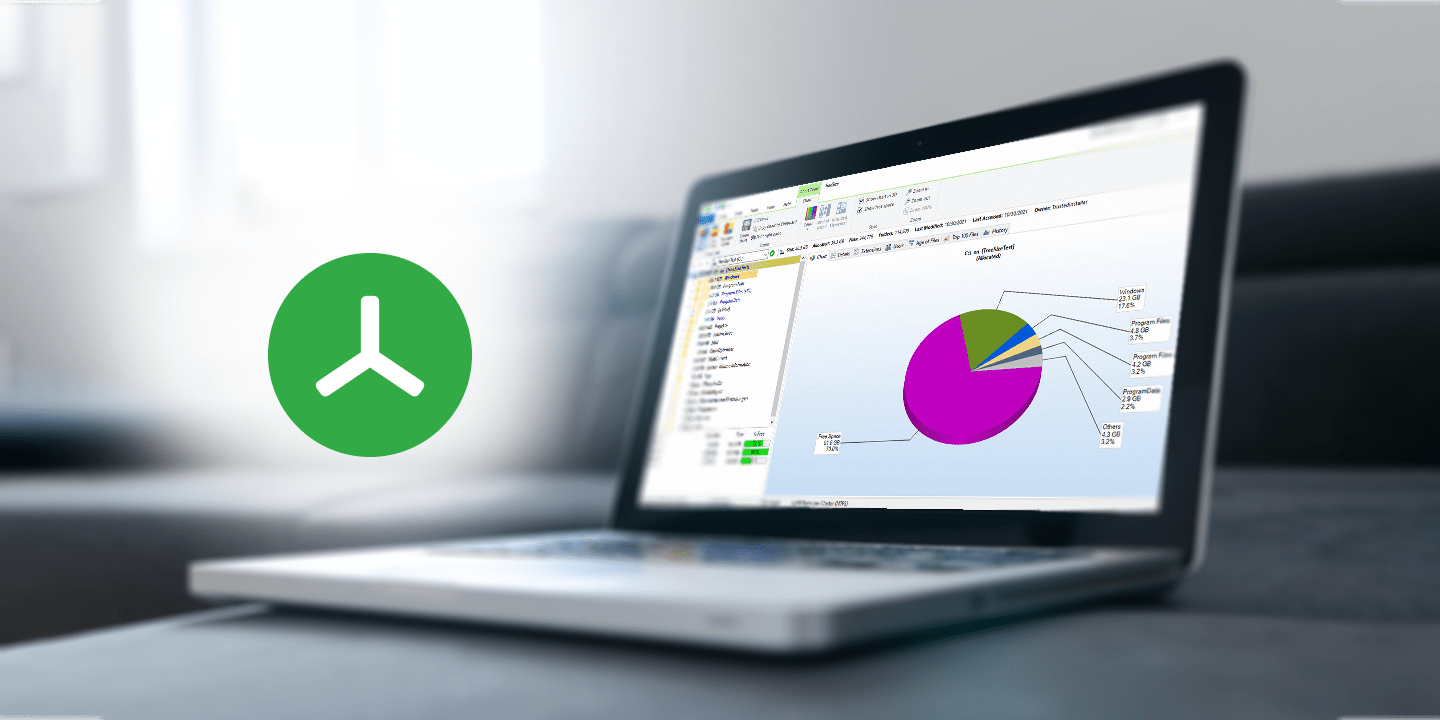
- Pie, bar as well as Treemap charts for a clear overview of disk usage
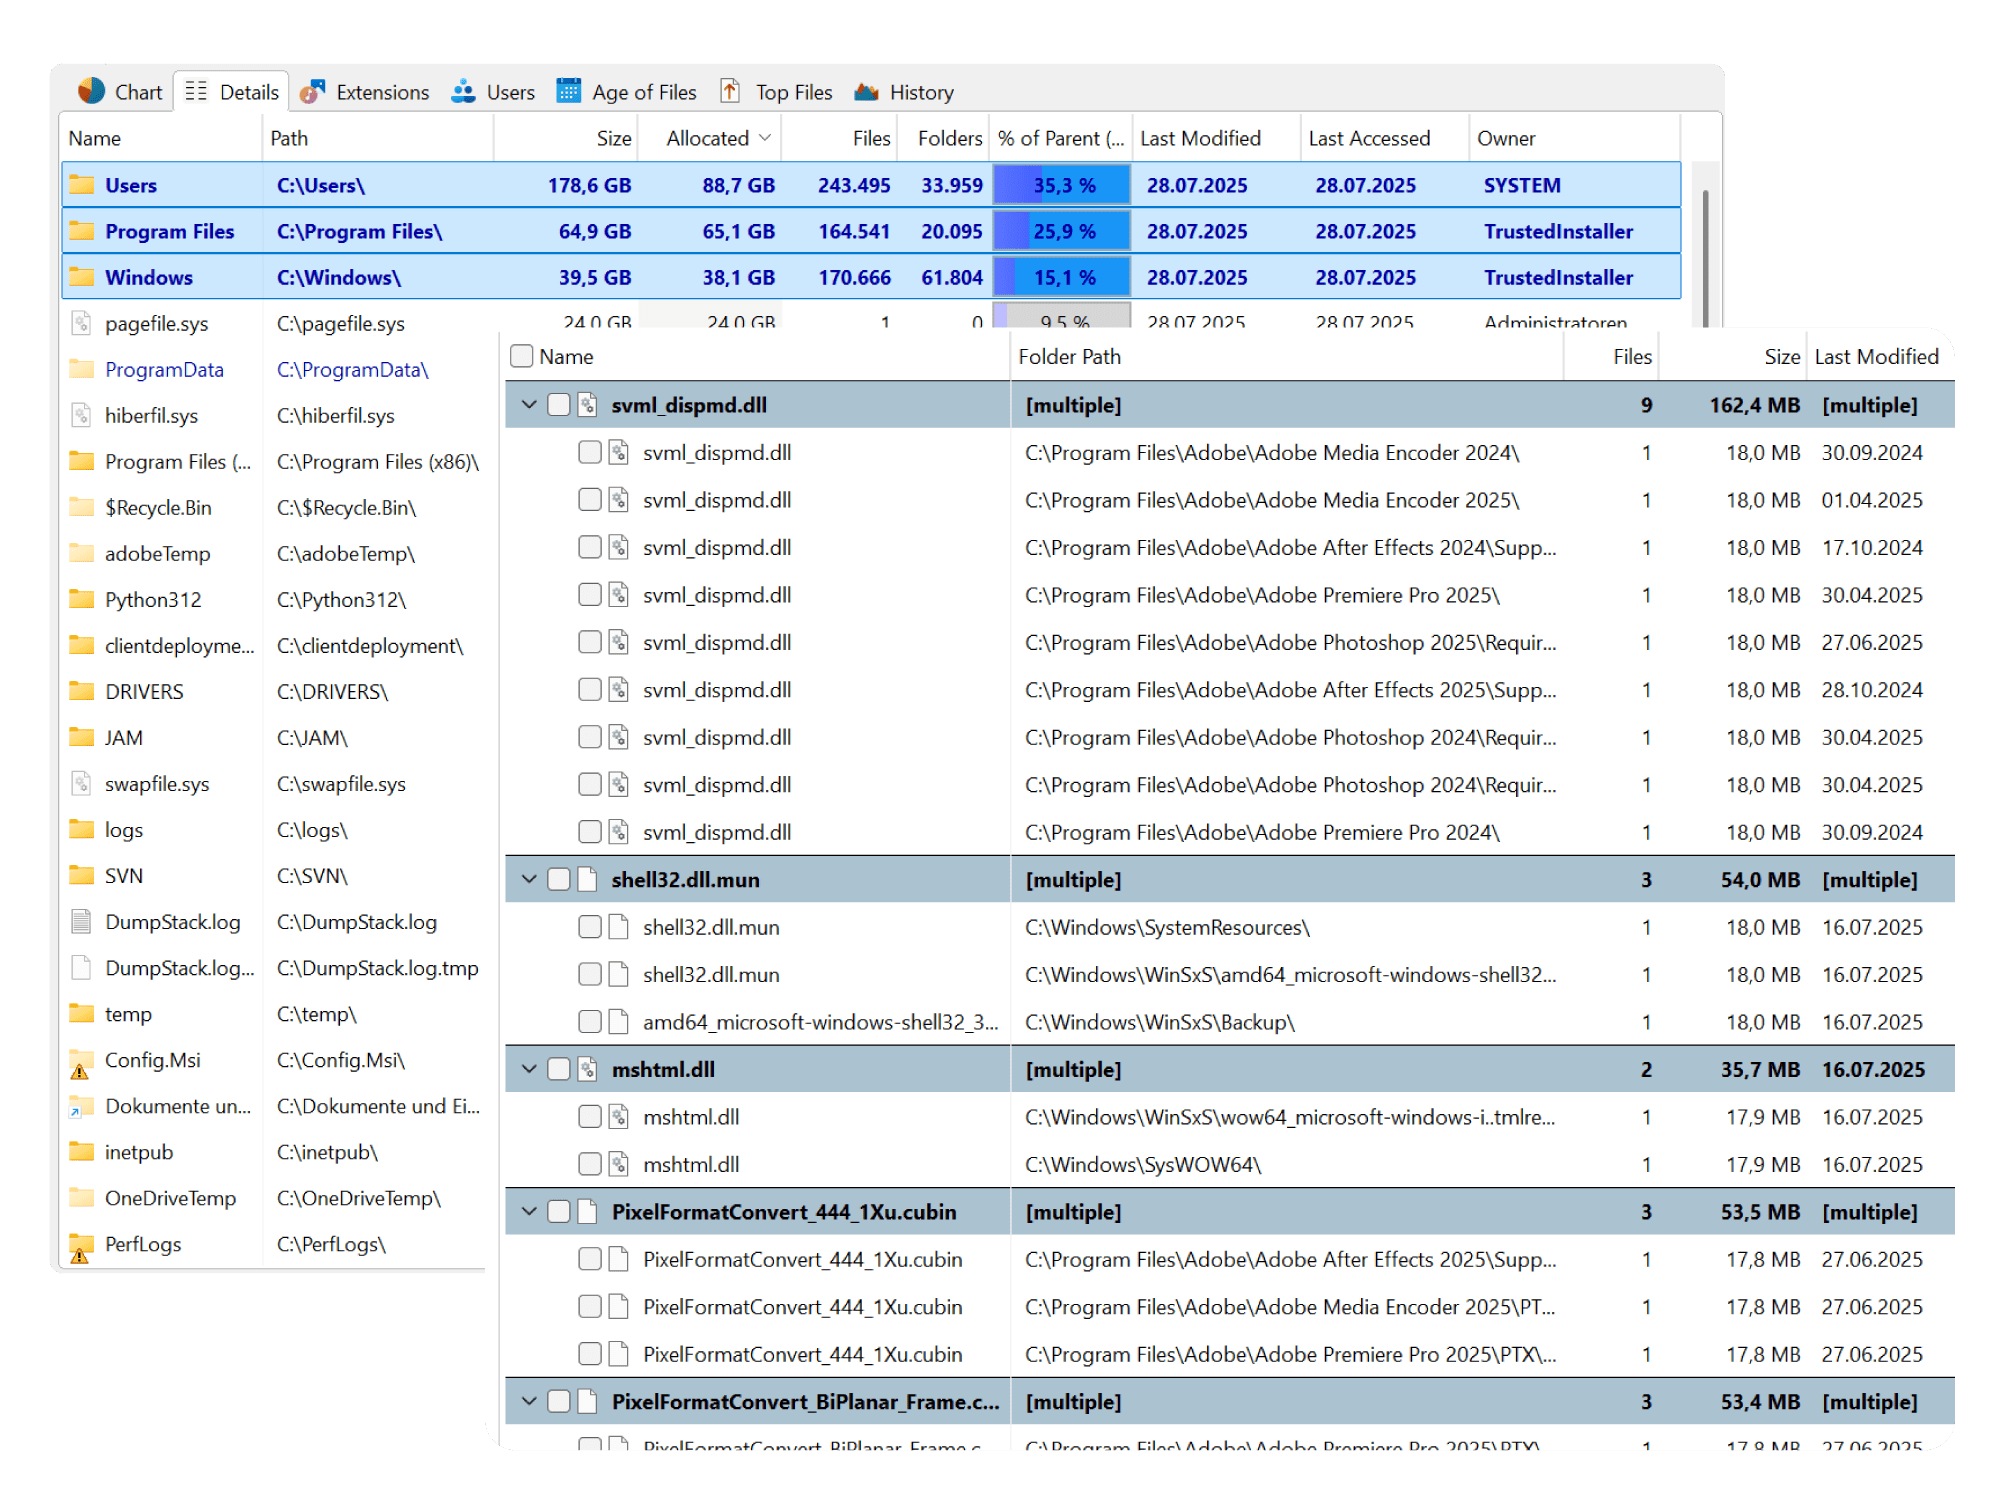
- Detailed folder breakdowns to pinpoint space consumption
Whether you're analyzing local drives, network shares, or cloud storage, TreeSize quickly identifies large files and hidden space hogs. With these insights, you can clean up disk space more efficiently than ever before.
More Structure: Organize your storage systems and improve your disk cleanup setup
Effective storage management begins with structure. Organizing directories, locating duplicates and removing clutter becomes more effective thanks to TreeSize. Perform mass actions like deleting, moving, bulk renaming, or archiving files even across platforms, to clean your disk space more effectively.
TreeSize Professional comes with a fully customizable file search with multiple filters so finding and organizing your data becomes easier than ever.
All TreeSize Editions work on a fully on-premise basis. No data ever leaves your PC, so you stay completely in control of your information.
More Efficiency: Automate Reporting and Ensure Audit-Readiness
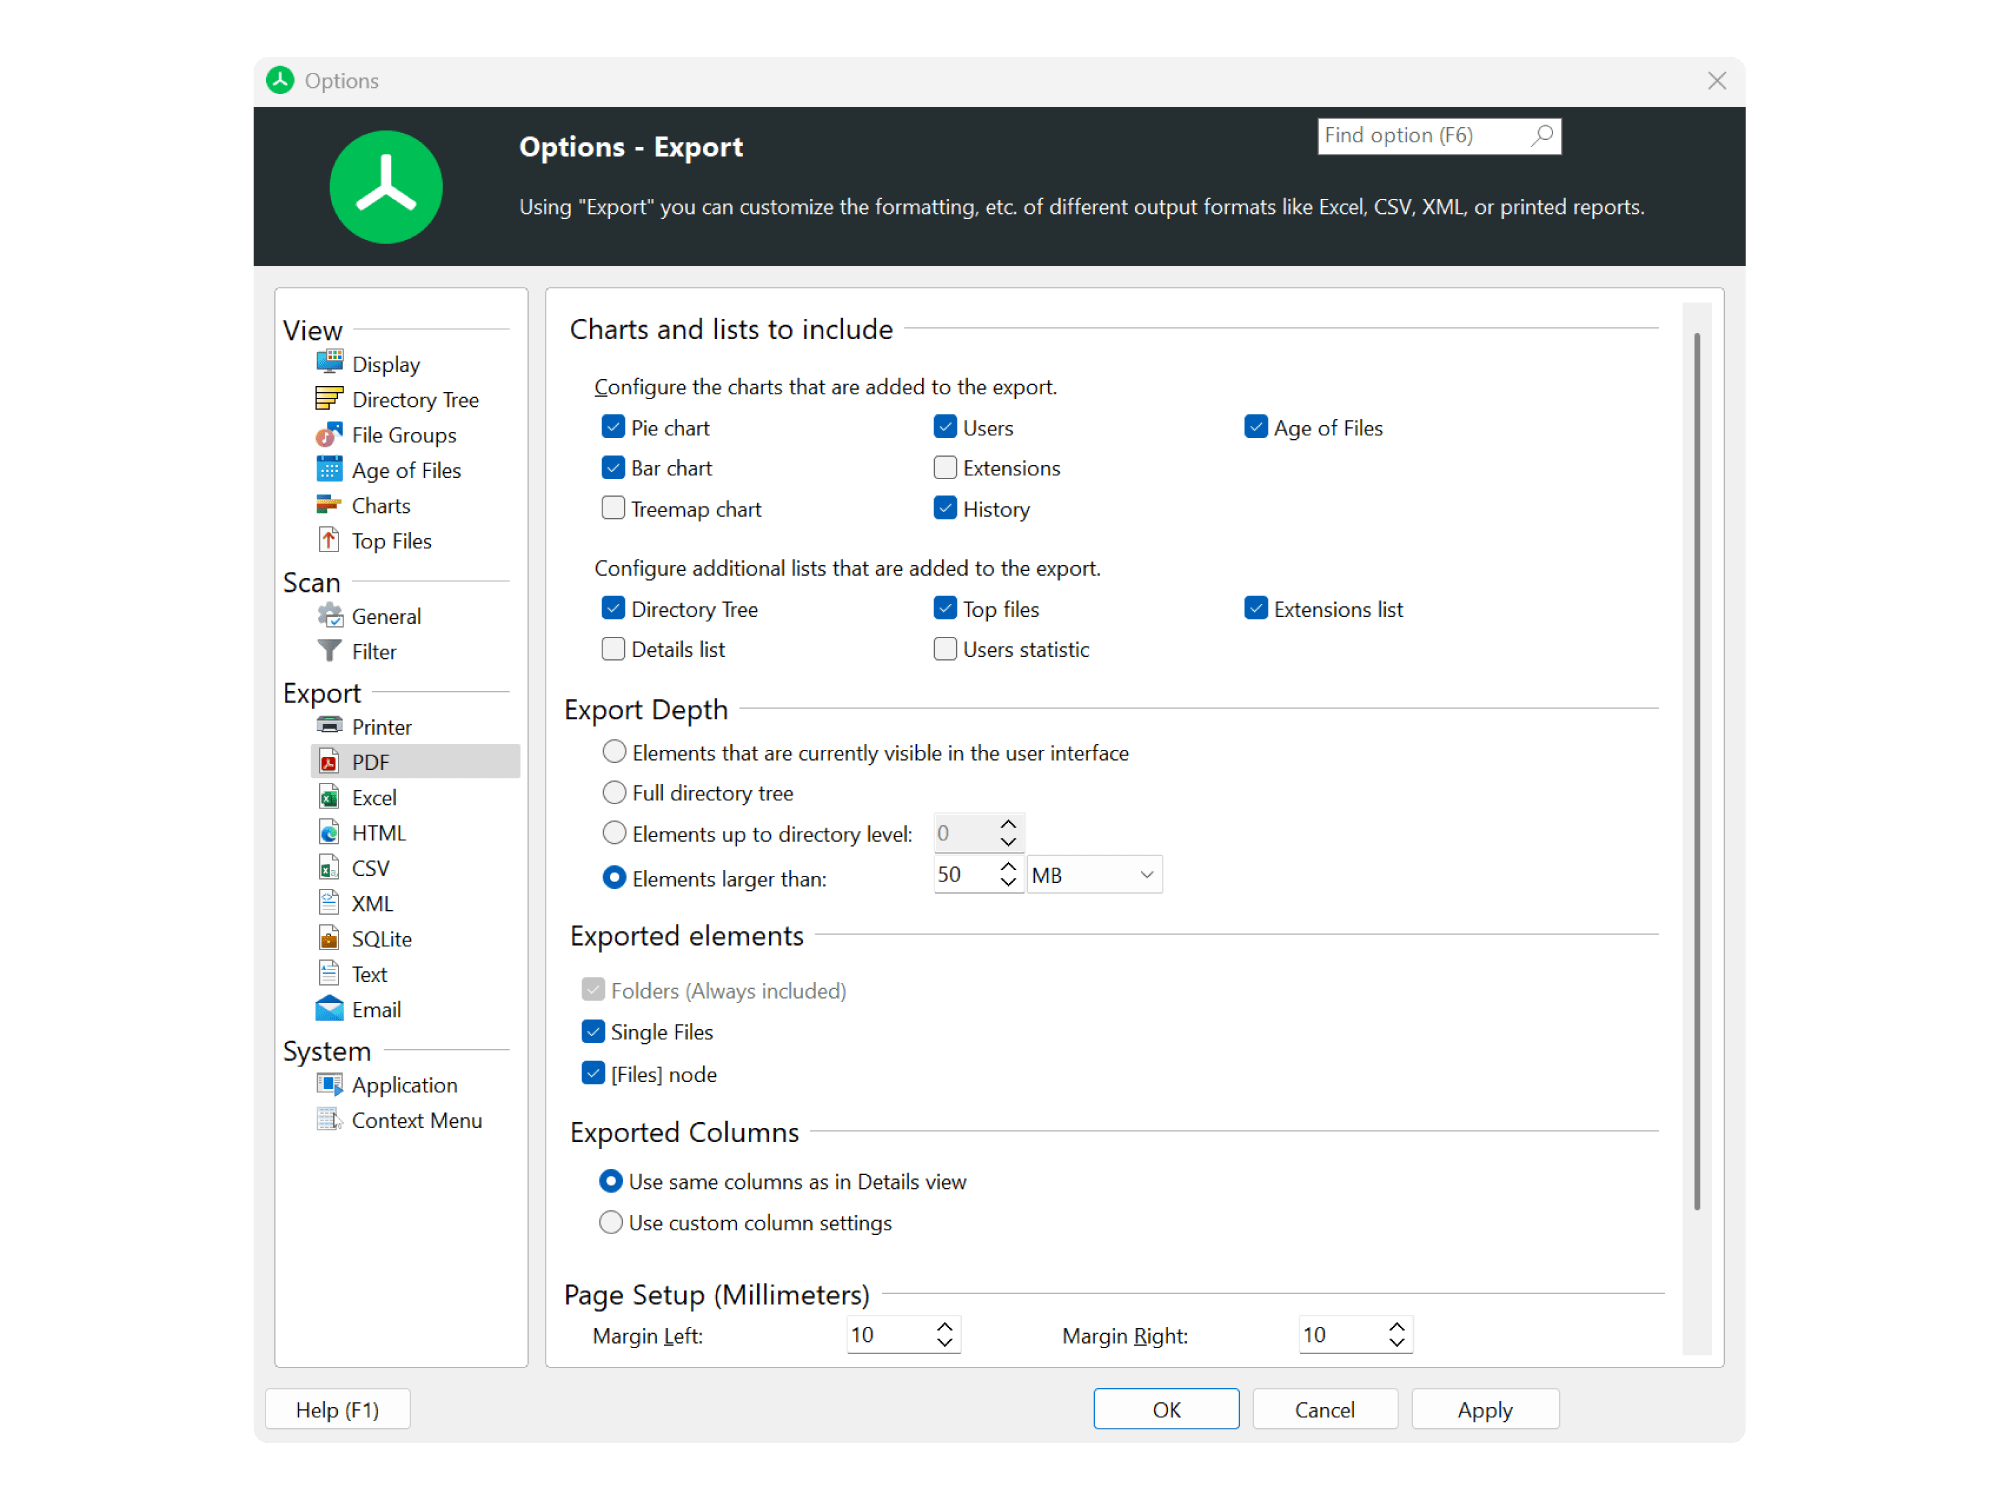
Stay in control of your data landscape without wasting time on manual reporting. TreeSize lets you generate detailed reports on storage usage, file types, ownership, and folder structures, which makes this disk space analyzer perfect for internal tracking and space monitoring.
You can export your scan results in popular formats such as PDF, Excel, or CSV and automate delivery via scheduled tasks or email. TreeSize takes automation and audit-readiness of your storage management to the next level!

More Scalability: Analyze Small Devices or Entire Storage Systems
No matter wether you're cleaning up disk space on your personal PC or analyzing company-wide storage management solutions. From TreeSize Free to TreeSize Personal to TreeSize Professional, we offer the right edition for every need.
Need to use our software on different systems without a full installation? Select editions let you create a portable version to run directly from a USB drive.
Looking for long-term storage analysis and data lifecycle management instead? We've got you covered with TreeSize’s big brother SpaceObServer as your enterprise storage manager to help you go further.
Different Versions for Different Requirements
|
TreeSize Free

Home User
(Windows Desktop) For private use in a non-commercial environment.
|
TreeSize Personal

Power User
(Windows Desktop) Ideal for advanced users, smaller businesses and freelancers
|

Sys-admins & power users
For IT professionals managing storage in-house
|
What Our Customers Say
Users Love Us
The Users Love Us badge is earned after collecting an average rating of 4.0 stars on G2.
Where TreeSize Comes in Handy
Discover why TreeSize is your best choice for visualizing, managing, and cleaning up storage - efficiently and at scale in corporate environments.


Frequently Asked Questions
Is my data secure while using TreeSize?
Yes, at JAM Software, data privacy is a top priority. All TreeSize editions operate entirely on a local, on-premise basis. Your data never leaves your computer or your site. We guarantee that no data is shared with third parties, including during development.
Furthermore, all your customer data is handled with the utmost care and in full compliance with the GDPR. All our servers are located fully inside of Germany.
Can I automatically monitor disk usage over time?
Yes, TreeSize Professional includes scheduling features where you can set regular scans, generate comparative reports, and receive alerts if certain thresholds are exceeded. This is particularly useful for monitoring growth on file servers.
We offer SpaceObServer as the next-best solution for enterprise-level storage management, providing continuous monitoring of storage space and fully automated reports.
Is the TreeSize license user-based or system-based?
The TreeSize license is both user- and system-based. One license covers usage on one to three hard assigned systems (non-simultaneously) and one user. Please note that the license is non-concurrent, meaning it cannot be shared between multiple users or systems simultaneously.
Can I use TreeSize Free on my Windows Server?
No, TreeSize Free is not usable on Windows Servers. TreeSize Free is intended as a free disk space analyzer for personal, non-commercial use on desktop systems.
For professional environments, including server usage, we recommend TreeSize Personal or TreeSize Professional to meet your business and IT needs.
How can I find out what’s using all my disk space?
You can use TreeSize to scan your storage and visually break down which folders and files are taking up the most space.
Scan entire drives or specific directories and see a real-time folder tree sorted by size. It even lets you drill down to file-level details and provides bar charts for better insights. This makes TreeSize the optimal disk space analyzer.
What’s the best way to clean up disk space on Windows?
To clean up disk space, start by analyzing what’s consuming storage like large files, duplicates, or outdated backups. Then selectively delete what you don’t need.
TreeSize makes this process simple by allowing you to sort files by size, age, or file type. It also includes filters and allows direct deletion within the interface, streamlining the cleanup process. TreeSize Professional offers even more filter options and is therefore the best help to clean up storage on Windows.
How do professionals manage disk space across multiple computers or servers?
IT teams often need centralized tools that can scan across network shares and generate automated reports.
TreeSize Professional supports scanning of network drives, UNC paths, and Windows servers. You can schedule scans, save and load scan results as index files, export reports in various formats (like HTML and PDF), and even integrate it into scripts via command-line options.
What types of visual reports help with analyzing disk usage?
Effective disk analysis tools provide visuals like folder trees or treemaps to show data usage at a glance.
TreeSize Free provides these features while TreeSize Professional offers even more like a structured folder view, bar charts, and customizable report exports. It highlights large folders and lets you see file types grouped by extension (e.g., videos, documents, system files).
How do I scan an external or USB drive for space-hogging files?
TreeSize detects all connected volumes automatically, including USB drives, SD cards, and external hard drives like HDDs and SSDs. Supported Formats are NTFS as well as exFat. Just select the drive from the start screen and begin your scan.
Is this the latest official version?
Yes. We publish new releases on the official product page first. You can find the release notes in the changelog. Our legacy versions can be found here.
Your Data Safe in Your Hands

Our on-premises software puts you back in control of your data. Our solutions work entirely without cloud services - your data always stays with you.
And to ensure GDPR compliance at all times, our servers are located in Germany, today and tomorrow.